Friday, August 23, 2013

[Tutorial] Torch tutorial

In this tutorial I pretend to show the final product of a torch for your games in Unity3D, the following video shows how to create a low poly torch, from it's modeling, texturing until it's final result.

(Only the first 9 and half minute contains the tutorial, by a problem with Youtube the rest of the time is just a black background)


You can download the torch files here: Torch Files

The next video shows the final result with the fire and smoke in the torch.


To see how to create the fire and smoke, check Sycmasters's tutorials in the following links.


[Tutorial] Smoke effect particles.

Hi everyone, this is the second part of this tutorial about particles for torches effect inside Unity3D, in the first tutorial we can find here (http://thebloodyshadows.blogspot.com/2013/08/tutorial-fire-effect-particles.html), we have a flame already like one from a torch, now the torch's flame burns the wood from it (if it happens that we are using a wooded torch) what makes smoke, in this tutorial we will see how to make smoke come out from the fire.

Remember that one of the most important element in particles is the texture, and as the former tutorial, here I leave the needed texture for smoke effect.


Now let’s create a new material for particles which we will use to create our smoke, head toward the project window and hit Create > Material and we are going to name it Smoke, next in the inspector we’ll change the shader from Diffuse to Particle > Additive and the main texture place our texture.

Now that we have the material ready to use, hit GameObject > Create Other > Particle System and in the scene you can see a buch of white dots as particles.

Now in the inspector we can notice the particle system (Shuriken) go ahead toward the bottom side of the settings in the inspector to reach at the Renderer window, change the default material with the material we made before, we can see how the white dots have changed to out texture’s shape,


Now at this point is exactly the same as the fire, but in changes in the shape and transparency thanks to the texture, now we will change some settings to make it look more like smoke, it can seems that some settings are very similar to the fire settings, let's begin!

Particle System


Emision and Shape


Color over Lifetime


1 = Color (RGB: 200), Alpha (15).
2 = Color (RGB: 21), Alpha (0).


Size over Lifetime


Renderer


Ok, now we have the smoke, this smoke is ready to place it over our fire effect, we can parent the smoke inside the fire object to make it like it comes out from the fire.

I hope it helped you, any doubt do not hesitate in comment and soon we will be seeing more effects in following tutorials, bye!

Sycmasters


Thursday, August 22, 2013

[Tutorial] Fire effect particles

In this tutorial we’ll see how to create special effects in our games, we gonna split the tutorial in two parts, starting in how to create fire with the particle system, creating a fire effect which you can use for torches or so, and the second part will be how to create smoke effect using particles as well.

To start what you have to know is that the most important thing or fact in an effect like fire using the particle system (Shuriken) in Unity, is the texture, we can change parameters in our effects and make it look as we like, but if we don’t have a good texture which define the effect’s design, it won’t look very good.

Said this, let’s move forward, first and very important as we said is get a good texture. We’ll use this one in this tutorial and you can download it to use it and follow the tutorial


Or you can créate one by yourself, in other tutorial I’ll teach how to créate a good texture for particles in Unity.

Now let’s créate a new material for particles which we will use to create our fire, head toward the project window and hit Create > Material and we are going to name it Fire, next in the inspecto we’ll change the shader from Diffuse to Particle > Additive and the main texture place our texture.

Now that we have the material ready to use, hit GameObject > Create Other > Particle System and in the scene you can see a buch of white dots as particles.

Now in the inspector we can notice the particle system (Shuriken) all the settings that we can modify in the particles, let’s begin and head toward the bottom side of the settings in the inspector to reach at the Renderer window, change the default material with the material we made before, we can see how the white dots have changed to out texture’s shape, but it doesn’t look like fire yet, right? Ok, even if our texture is the most important, is not enough to reach at the effect we want to get, to get there we have to change the settings in our particles.


Let’s change the settings for our fire particles.

Particle System


Emision and Shape


Color over Lifetime


1 = Color (White), Alpha (0).
2 = Color (R: 255 - G: 202 - B: 25), Alpha (255).
3 = Color (R: 111 - G: 0 - B: 0), Alpha (255).
4 = Color (Black), Alpha (0).


Size over Lifetime


Renderer


IMPORTANT: if we want to know what is an option for, just place the cursor over it without move it and a tooltip will appear with the explanation.

You can change it as you like, but that is the configuration that worked for me, but you can modify it as you want to, color, size, texture, imagination is the limit!

Ok hope you like it and worked for you, we will see other kind of particles and effects in another tutorials, bye!

Smoke tutorial (http://thebloodyshadows.blogspot.com/2013/08/tutorial-smoke-effect-particles.html)

~ Sycmasters


Friday, August 9, 2013

[Info] Basic Introduction: Entrance to Programmation

Hello people. in this post I wanted to head toward those who want to begin in this world of programmation, I'm not trying to impress someone or say that I'm the most experimented programmer you will ever find, but I'm trying to spread the opportunity to the people that get a harsh time trying to understand, so I want to put as simple as I can.

As well as I suppose that if you wanted to reach here to learn, is because you decided to study this topic and at least have made a little bit of research through the web about really basic things and meanings, said this, we can keep going. I will just start with some basic things that you can encounter in this blog and might be asking about what is that, things such like classes, variables, functions and so.

Class: A class, putting it in simple meaning, we can say that is a template of some sort of object, that contains descriptive status, data and functionality of something we want so we can use it later on. This concept is a little complicated to understand in a begin, so don't worry if you don't catch it right now, we will see this a lot.
Variable: variables are a place in a memory where we can store some data (Interger, Float, Boolean, String), an example can be a box, where we store the bills for example, whenever we need a bill to check out something, we can go and check that box for the needed info.  
Contant: Is the same thing about variable, the difference lays in the value, a variable (as it's own name tell us) can change it's value along the script or code, but a constant will never change its value after we declare it.
Function: There are determined processes or calculations that for some reason we keep repeating several times, and it can turn a bit annoying, repeating something again and again, there is were (the super!) functions comes to save us, they are pieces of code that encapsules a bunch of statements that we can call later (by an established name) as many times as we want.
Conditional Structure: A script or more complex, a program, is a complicated task, to keep it clean and easy to manage, it must be structured, but it can't just go through operations and exact calculations, mostly in gaming, you will find in one point or another,  a condition that you have to perform to do some functionality depending on a certain calculation, you can look for the next structures: IF and ELSE.

I think that will cover the basic for now, so you won't be lost in some tutorial when you reach these definitions, you don't have to worry about more complex things right now, as you will "learn on the road" as I always say ;) you will be learning more other things throught another tutorials and hopefully you will find this helpful and simple.

Sycmasters


Thursday, August 8, 2013

[Info] Unity Programation: Unity JS vs C#

Hi everyone, this post has the objective to make an introduction to the both of the most used languages when you are programming in game engine Unity3D, we all know (and if you don’t, now you do) that Unity allows us to manage code in three different languages: Boo (that is a reference about Python), C# and Javascript (known as Unityscript as well).

In this post as said before, we will only be touching the both of the most popular languages, C# and Javascript, as seen in different forums, websites and so, those are most used.

First off we are going to talk about Javascript, when we are talking here about Javascript or Unityscript we are not referring the exactly same web language, but we are not getting much into this, said that, when you are just starting to use Unity this could be your best option to start with, why? I leave you these few points of why you should use Javascript when you’re just beginning:

1) Is more flexible: If you are more related in programming environment, you know that there are different types of variables for different usages, in Javascript when you are declaring a variable you can or not declare the type of variable you are using, then as the code goes, Unity will find it out but it’s own and do it for you, so if we are doing something wrong, Unity will not be such a pain and will even figuring the correct way to fix whatever is wrong (except for syntax errors).
 2)  Is a little easier to understand and manage: As not everything has to be so strict (like in C# case) you can follow a more understandable line in your code, that’s called Dynamic Typing , the only problem is that it could run just a little bit slower as Unity has to find out dynamically all the things we left in blank.
 3)  More support on Script Reference:  When you check the Script Reference everything comes in Javascript by default (coincidence?) but you can change it to either C# or Boo, but when you go deep inside the Reference you can notice that there are some features that is only documented on Javascript.

Now let’s move to C# shall we?

C# is a very known language mostly used in software such like Visual Studio, where we use it for Microsoft platforms, is nearly the same thing and it’s easier to use it when you want to use the MSDN libraries (for people who is most used to this environment), if you are more involved in programming you could use C# instead, let’s check some points:

1)  Less flexibility but more features: with C# you can manage much more data than with Javascript (thing that is being fixed lately) and you can use more fancy features using this like a bridge to communicate with some external data that Javascript could not.
 2)   More strict but more accuracy: As C# is more strict, and you have to type all the variables kind and functions, there’s no room for the error, every syntax error or some functional error on the code will be warned to you before run your code, for example when you try to convert one kind of variable to another and you do it wrong, it will throw a message to you in the console telling what are you doing wrong.
 3)  More access to System tools: This point is more for people who already is involve in programming, you can access to more advance features, like I said before, to communicate with things out of Unity.

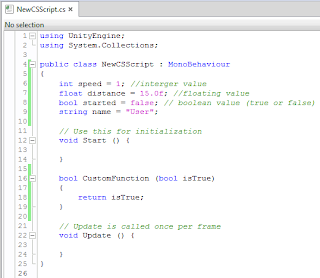
Well now that we have seen both of them and a few of their features, some of you must be asking yourself the thing about being ‘strict’ on C# over Javascript and about typing and so, so let’s show some examples:


First you can see in the C# window (up) that there is a “Class” written right there and in the Javascript window (down) there’s not, that’s because Unity atomatically makes a hidden class out of the script name, unlike C# where you have to declare your class, that could make a harsh moment most for the new users because of that, you can’t use a script that has a different name than the name of that class we declare on the script (so forget about just copy and paste another whole script without getting an error ;) ).

Another example is in the functions we see there, we can notice in C# window that we have fist to type the return value of the function, for example void (it means that it does not return a value) or bool, then we type the name of the function (and the same for the parameter inside). It happens the same with the variable, but in Javascript we can see that for typing a variable we have just write the word var and is not necessarily to write the kind of variable we are declarating (like we did with “started” variable).

Another difference is that in Javascript the default kind of variable is a “public” variable, it means we can see the value of the variable in the Unity Inspector, to make it private (to hide it in inspector) we have to type the word “private var”, unlike C# that the default is a private variable instead of a public, and we have to type the word “public” followed by the type of value we are using on that variable.

So to end this post, let’s make ourself a question: Should I pick Javascript or C# as programming language?

Well, there is not a right answer for that question, but what I can suggest to you is if you are only beginning in all this about programming, Javascript can be a lot easier for you to start with, and it doesn’t mean you can’t start with C# as it’s only my point of view. And if you already have the knowledge of you are more involved on programming and want to do more advance features and fancy stuff, I suggest you to try C#, but the most wise practice you can do is try to take a script and translate it from one language to another, like English to Spanish and viceversa.


Well I hope this have helped you in your way to start in programming with Unity3D, keep looking at this blog to help some others (hopefully) useful tips and guides for you.

~ Sycmasters


Wednesday, August 7, 2013

[News] Welcome to the world hidden between the shadows

This is a new attempt to get into the world of gaming from a perspective that might be different from others, or might be the same, it's a total secret! We are the people behind the shadows, gamers, developers, geeks, all the people who could enter in the past description.

We enjoy videogames and everything related to them, we enjoy playing them, make them, inspecting them, testing them and much more. We could reveal a lot of material in this page, much of it has been already seen, some other could be the light that enlightens your mind. But we do hate being so technical about stuff, we have checked another blogs, websites and so and they are made for people who are much deeper into games than just casual people who might be wanting to go inside this world, so we prefer to simplify the things around.

Said that, the only left now is to begin with this blog hoping you can find it helpful or at least really funny to stay in, now you better take a seat because this could get a little bit bloody!

~ Sycmasters